Introduction
Coming to robotics from a mechanical engineering background, I found myself wanting to know more about how computers actually work and what happens under the hood of the software we use every day. The projects shown here summarize some of my self-learning experiences to satisfy this curiosity.
Projects
Linux From Scratch (LFS)
In this project, you download and compile all the separate pieces to assemble your own bootable Linux distro. No coding is done, but you need to be able to follow instructions, know how to debug and know a bit about UNIX. I finished the project and registered on their database here. My LFS id is 28548.
6502 modification
The 6502 is praised for its simplicity and remembered for the impact it had on personal computing, so I
decided to work though this tiny e-book I found called Easy 6502. After reading the little book, I modified
the snake game presented there to reinforce what I had learnt. The modifications make snake’s
stomach contents visible. The code can be found on my GitHub here and the next video shows a snippet of the gameplay.
From NAND to Tetris
After playing with 6502, I was confident enough to try Nand2Tetris. The
subtitle
“Building a Modern Computer From First Principles” is actually just
the first half of the course! In part 1, using only the NAND
gate and DFF’s,
you build the chips to create the Hack computer: an
educational (MISC)
architecture. This is done in an educational hardware description
language provided with pre-written tests to make development
incremental. By the end of the course you write your own assembler
for Hack in the programming language of your
choice.
In part 2, you build a compiler targeting Hack for the
Jack object-oriented programming language which the authors
created. My compiler and assembler were both written in Python. You
also get to implement any project of your choice in the Jack
language to learn how it works. Typically, students go for Tetris,
hence the name Nand2Tetris, but I chose to implement snake. In the
final project, you implement the system calls provided by a bare bones
“operating system” in Jack.
The next clip
shows the hardware emulator running my snake clone. When
loading snake without the self-written OS binaries, the emulator offers
to provide built-in versions. Then, when loading a version with snake
and the system binaries, the emulator immediately loads the program.
Instead of the direction keys, I used vi keys because
I was the target audience of the game. You can set the speed and length
of snake at the beginning of the game to help debug during development.
I also implemented playing the game at different sizes as a programming
exercise, though this is not demonstrated in the video.
MIT 6.004 - Computational Structures
The Computational Structures course explores important topics that Nand2Tetris skips: models of computation, cost/performance trade-offs, virtual memory, caching, memory hierarchy, interrupts, scheduling, pipelining and concurrency and compiler optimizations. I worked through the worksheets and labs of the 2017 version of this MIT ocw course. There are three major challenges in this course, completed using instructor developed tools:
- Programming a Turing machine to check if parentheses are balanced using the
TMSimTuring machine simulator. - Build a minimal RISC
processor called "Beta" using the
Jadecircuit simulator. - Modify a teaching operating system called
TinyOSin theBSIM"Beta" emulator.
The companion website implements all these tools using browser technologies. To see my answers to the labs in your browser:
- Right-click and select "Save Link as …" on my
saved_state.jsonfile here. - Navigate to the labs page here, scroll down and upload the file.
- You can then browse to any of the labs and my answers should display.
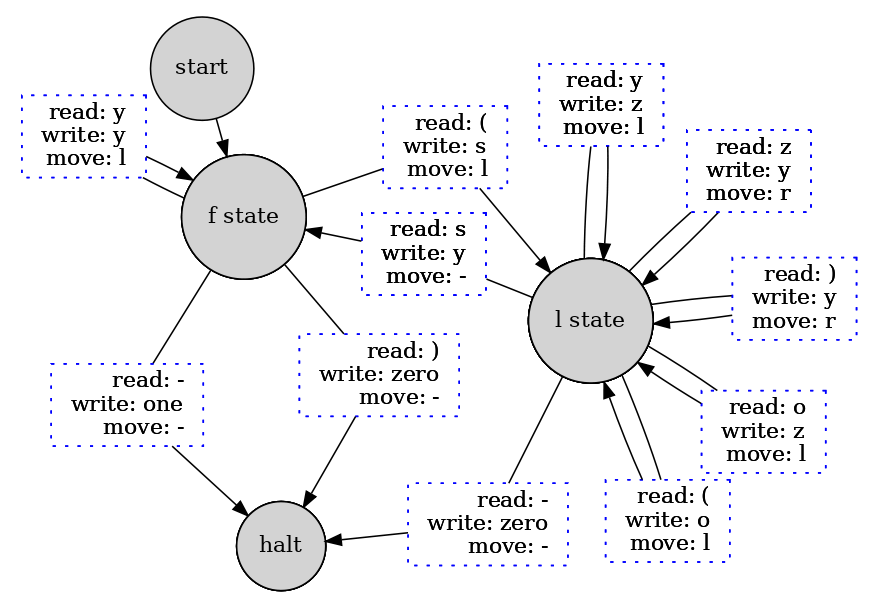
Parenthesis Checking Turing Machine
The next video shows a Turing machine programmed to halt on a 1 if the parenthesis on the
input tape are balanced and 0 if they are not. Doing it with only two states gets you full
marks. This was the most challenging part of the FSM lab. To see it in action, load my saved_state.json file as described before, click here, scroll
down and click "Open TMSim in a new window", click "TMSim assemble" and then "Checkoff".
To do it in just two states, I developed the diagram in the following image. The f state represents "found" and l is for "looking". The o symbol is for "open" and s is for "start". Symbols z and y are arbitrarily named. The l motion means move the tape left, r is right and - means don’t move. This corresponds to the language of TMSim as seen in the video.
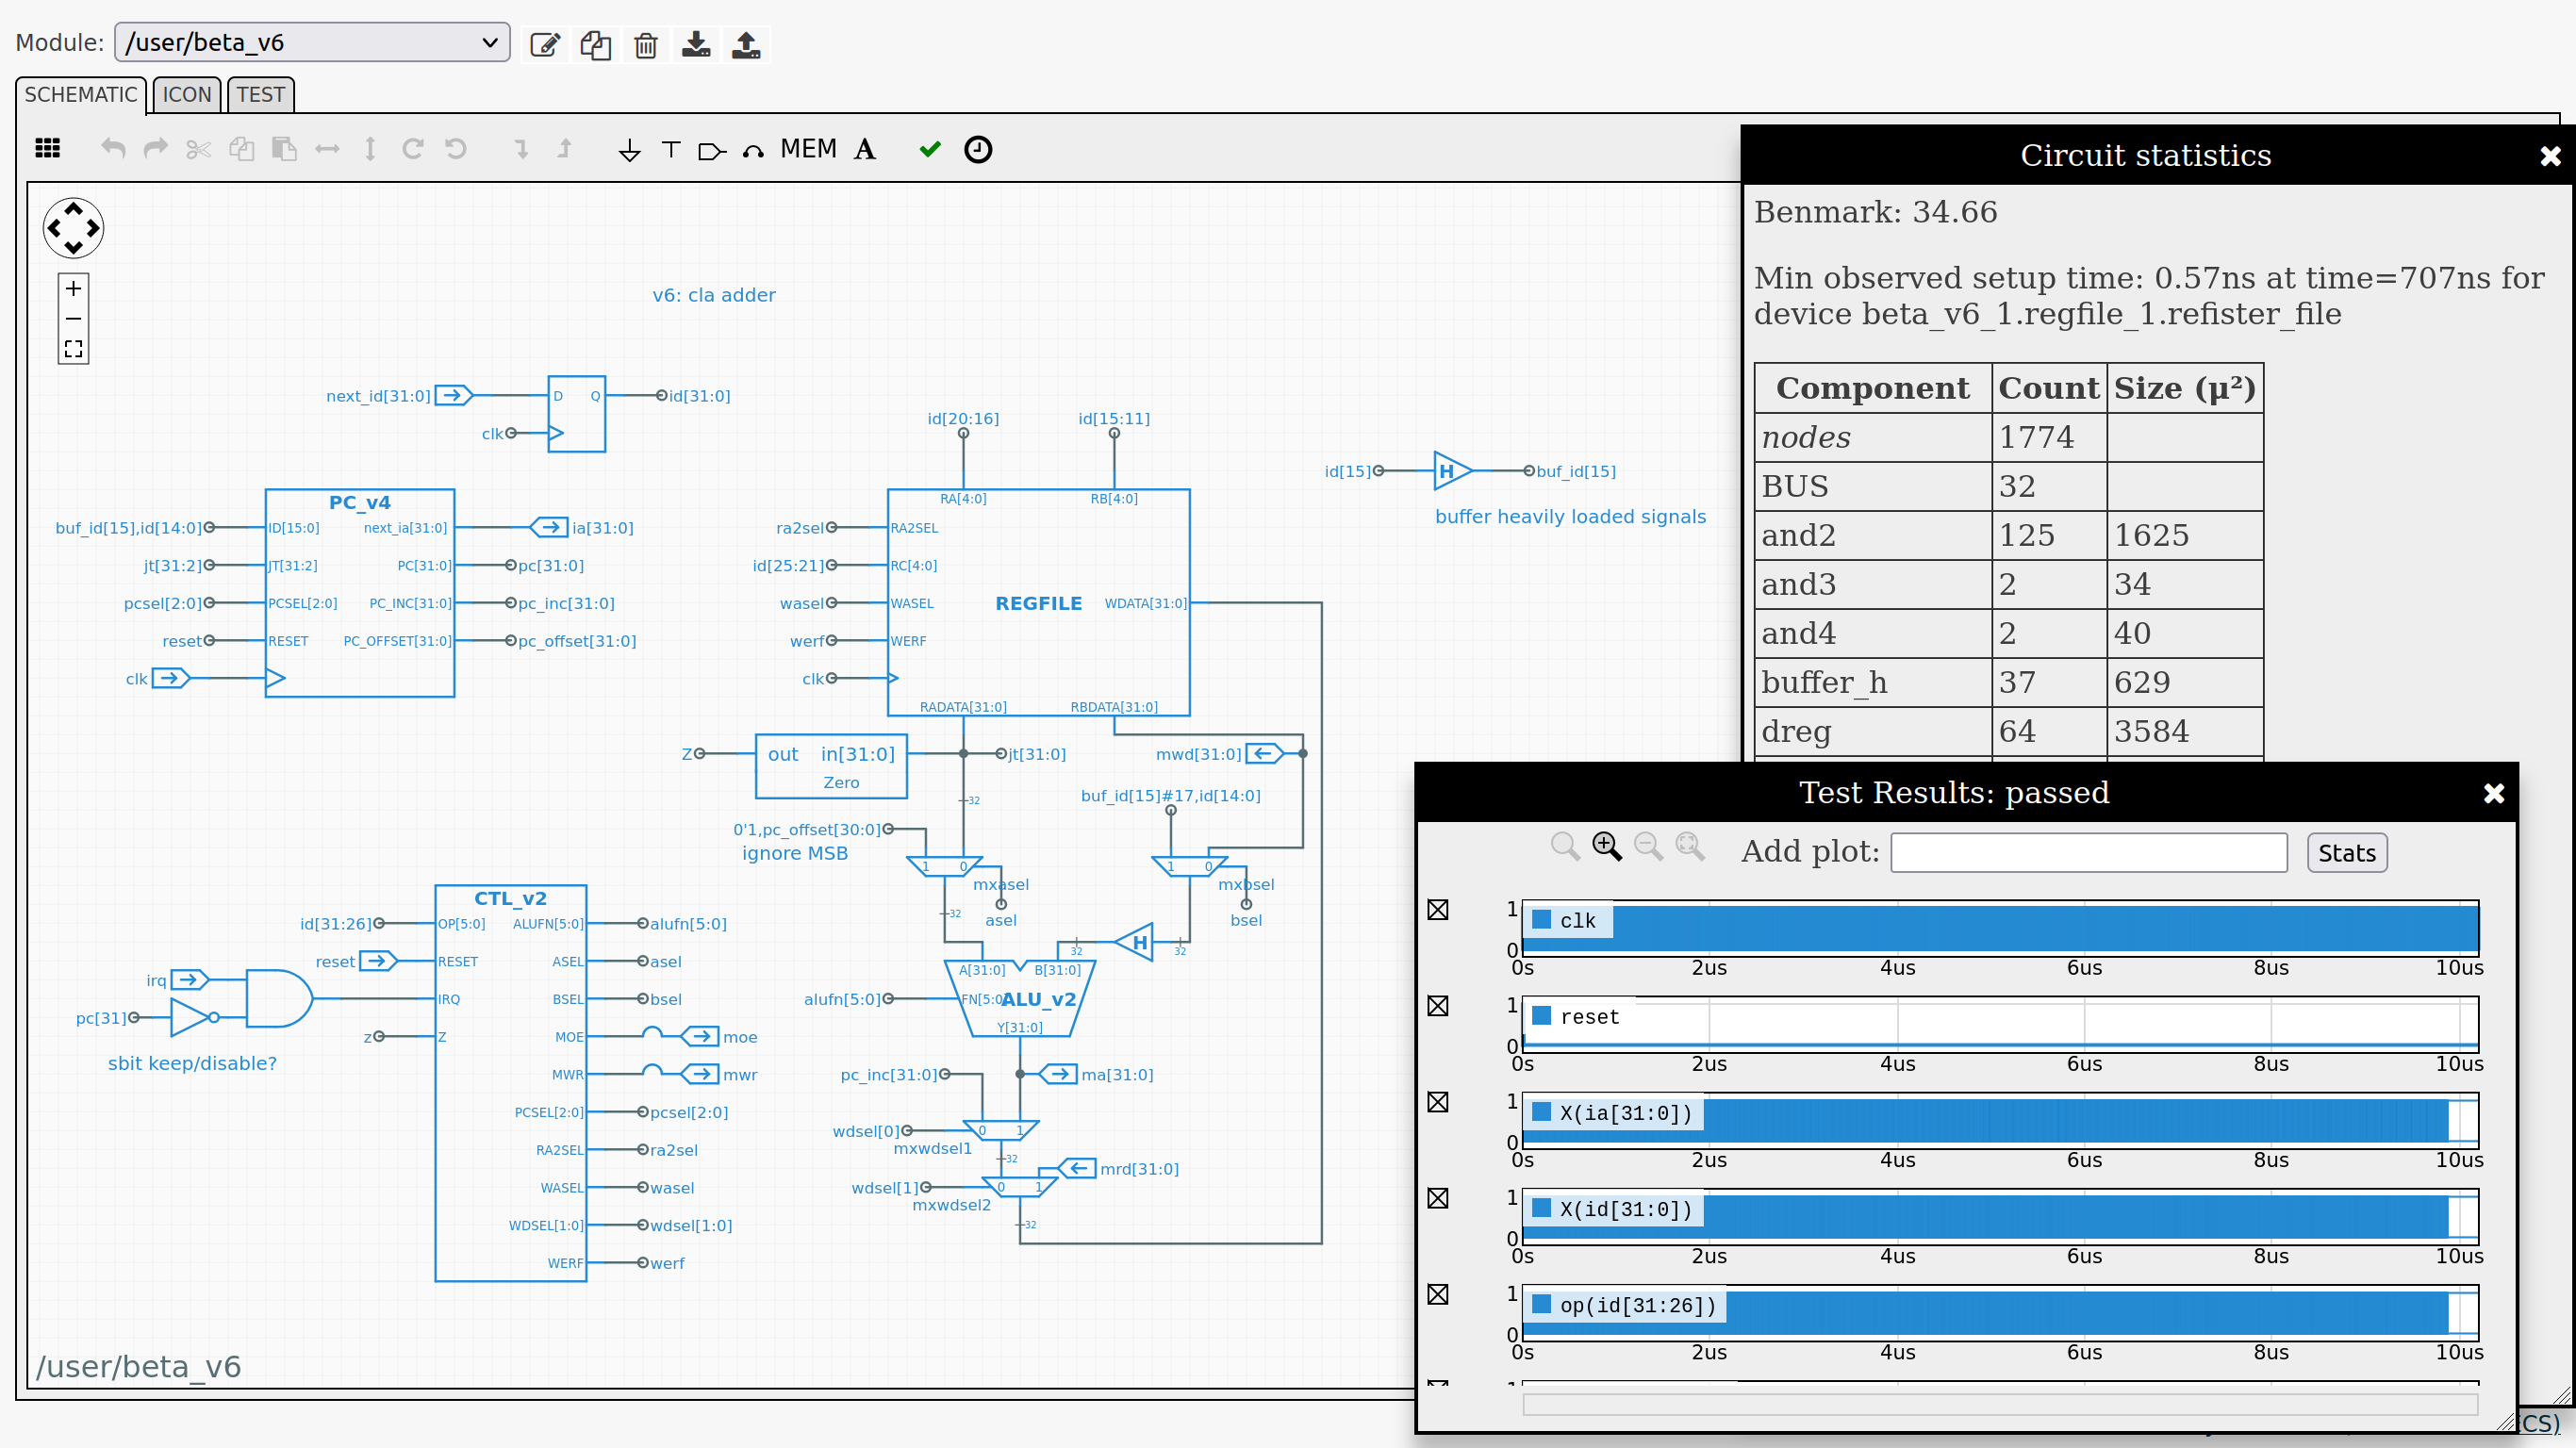
Build and Optimize the "Beta" CPU
The final lab is Optimizing the
Beta that you built in the previous labs. Here a "Benmark" of 20 is considered very doable and 40
requires considerable insight and investment of time. Though not considered a course requirement, I tried
to pipeline my design but failed (see lab for details). My final working design is tested in
/user/test_v7 and got a benchmark of 34.66. You can also inspect the Beta for
this test looking at /user/beta_6 and descending into its sub-components as shown.
Modify TinyOS
The TinyOS lab provides a
minimal time-sharing OS written in Beta assembly. The provided code has two user processes:
one periodically prints a counter value in hex and the other takes user input and converts it to Pig Latin. There are three design problems in this
lab:
- Initially, the Pig Latin translator doesn’t work. Once the kernel to user memory mapping is fixed, translations are printed at the console.
- Add a mouse device driver and print the coordinates of user clicks.
- Fix interleaving text at the console due to concurrent access by the user processes by implementing locking primitives.
BSIM has a simulation, schematic and editor views.
These can show the assembly code being executing on the hardware and
follow along line by line in the editor view. The first video below
showcases these features and the second shows the end result of the
modifications done in the TinyOS lab.
Ongoing Studies
I also started studying operating systems with materials from here, here and here, and plan to continue when I have more time.
Conclusion
I learnt a lot doing these projects and feel that I have a solid understanding of computation. It is not so much of mystery to me anymore how my code gets executed! I am confident that these lessons will help me to be a better software engineer.